Search
Get started
Log into your referral dashboard

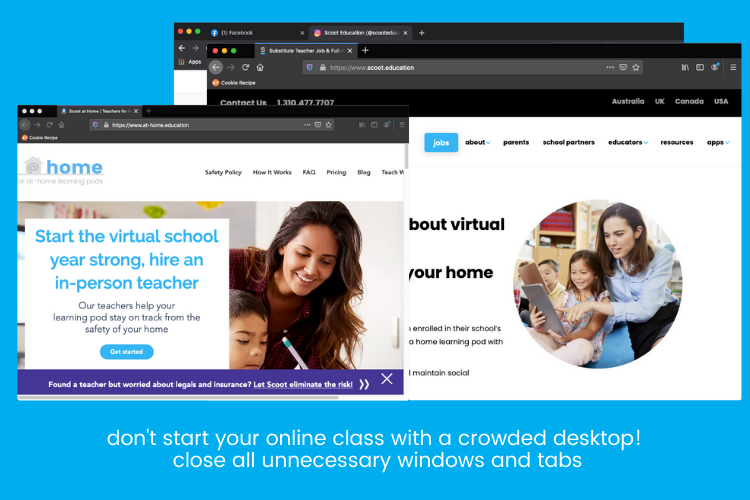
It’s easy to forget that when you’re sharing your screen with your online class, your students will see EVERYTHING that you’re sharing. And we mean everything!
Your past search history, email or message notifications, personal bookmarks, and that Instagram tab you still have open too!
You might feel that there’s nothing to be worried about but students who end up seeing something inappropriate or your private information may notify their families and other teachers. Then you’ll be in the hot seat.
It’s better to be safe than sorry!
Let’s go over the best screen-sharing practices in the virtual classroom to avoid students from seeing any of your personal and private information.
Below you’ll find a video tutorial as well as a step-by-step guide.
Video tutorial on how to share your screen
1) Be prepared before class
All because you’re teaching an online class doesn’t mean you should start preparing for class right when it begins.
Maintain professionalism by having all of your necessary files and windows open and ready to share for class.
Don’t let students wait for you to find things.
Searching for files can take up a lot of valuable learning time! You might also lose time due to unforeseen technical issues too.
2) Share your browser, not your desktop
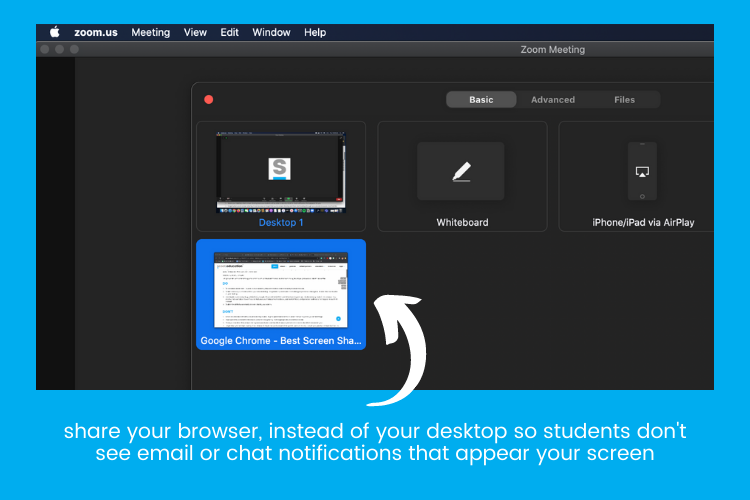
Screen share only a browser and not your whole desktop.
When you share your desktop, your students will see any unexpected email or message notification that can appear on your desktop. You never know if something unexpected can get you in trouble with the school.
Keep your notifications private by sharing only a browser!
3) Have a teaching-only browser
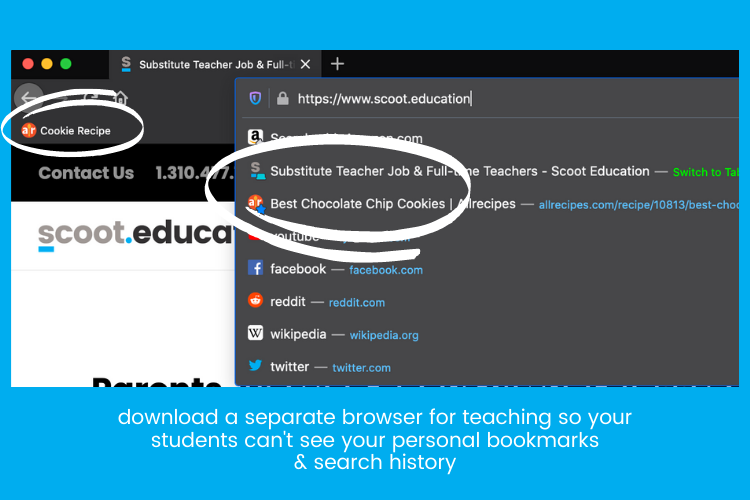
The browser you typically use contains all of your personal bookmarks and search history. It’s better to not expose your personal life to your students.
We recommend downloading a new browser (e.g., Safari, Firefox, Google Chrome) that is ONLY used when teaching and using Private Browsing mode in this browser. This ensures that your students won’t accidentally see your Instagram or Facebook, past search history, and personal bookmarks that appear in your main browser.
Some potential alternative browsers you can download are:
- Safari
- Firefox
- Google Chrome
- Internet Explorer
- Opera
- Microsoft Edge
4) Use private or incognito browsing
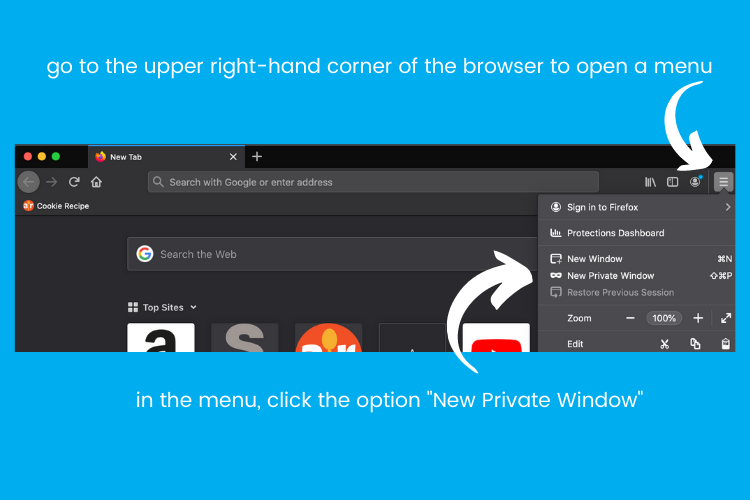
When using a browser only meant for teaching, we further recommend that you use a private or incognito window.
You can open a private window by going to the upper right-hand corner of your browser. You’ll see either 3 bars or 3 dots.
Click for a menu to drop down.
Within the drop-down menu, click the option “New Private Window” or “New Incognito Window.” A new browser should appear.
The private browser will erase all search history whenever you close it. So whatever you look at in the private browser will disappear when you’re done.
This ensures that each class you teach will not see what you were looking at for a different class or school.
5) Ensure you stopped sharing
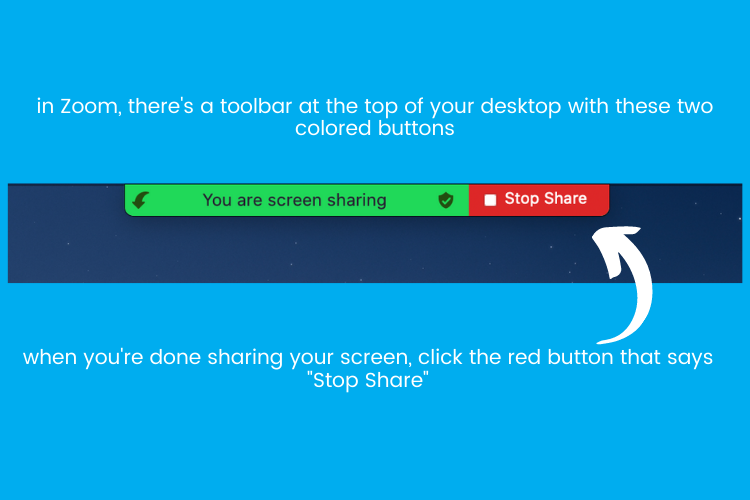
Double-check that you actually stopped sharing your screen. The class may be over, but your students are still watching you navigate your screen.
When you’re using Zoom, you’ll see a toolbar that has a green button and a red button.
The green tells you that you’re still recording.
Clicking the red button that says “Stop Share” will end the recording.
Use these tips when screen sharing to be a stellar virtual teacher and avoid epic screen share fails. Happy teaching!

How Scoot Education helped a New Jersey Poet channel his passion into teaching
Read more
Sub Guide: How to Introduce Yourself & Set Expectations
Read more![How to write a strong substitute note [+free template!]](https://scoot.education/wp-content/uploads/2022/05/thank-you-426x235.png)
How to write a strong substitute note [+free template!]
Read more
10 substitute teacher essentials: What to bring in your sub bag
Read more
7 Ways to Learn Student Names Quickly – Tips for Subs
Read more